You can install durable, attractive kitchen tile yourself with careful planning and the right steps. Choose the right tile and allow proper prep—measuring accurately, accounting for waste, and ensuring a flat, stable subfloor—so your finished floor looks professional and lasts.
This guide Kitchen Tile Flooring Installationwalks you through selecting tile suited to kitchen traffic and moisture, then shows the step-by-step preparation and installation tasks that matter most. Follow along and you’ll move from layout and cutting to setting, grouting, and sealing with confidence.
Selecting the Right Kitchen Tile
Pick a tile that matches how you use the kitchen, your budget, and the look you want. Focus on material, expected wear and cleaning needs, and the color/pattern choices that fit your layout and lighting.
Types of Tile Materials
Porcelain and ceramic are the most practical choices. Porcelain is denser and more water-resistant; choose a PEI rating of 3–5 for kitchen floors. Ceramic costs less and offers many glaze options but chips more easily on heavy-impact spots near sinks or ranges.
Natural stone (granite, slate, marble) gives unique veining and high-end appeal. Expect higher cost, periodic sealing, and more variation between tiles. Use honed finishes to hide scratches; polished stone shows wear faster.
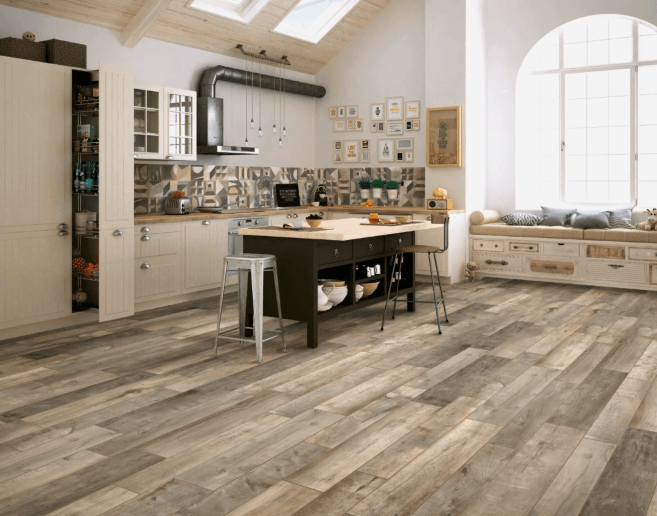
Vinyl and wood-look porcelain mimic hardwood and are easier to install. Luxury vinyl plank (LVP) is softer underfoot and forgiving of subfloor imperfections. If you want authentic wood, avoid real hardwood in high-moisture kitchens unless you accept more maintenance.
Assessing Durability and Maintenance
Look at the PEI rating, water absorption, and slip resistance when assessing durability. PEI 3+ suits most kitchens; commercial-grade PEI 4–5 works for heavy-use homes. Porcelain has low water absorption (<0.5%) and resists staining better than ceramic.
Factor in grout type and joint width—narrow joints reduce dirt buildup but require precise installation. Choose epoxy grout in high-spill zones for easier cleaning and better stain resistance. For stone, plan on sealing every 1–2 years and using pH-neutral cleaners to avoid etching.
Consider edge conditions and load points. Use thicker tile or backer boards under heavy appliances. If you have pets or frequent dropping of cookware, prioritize impact resistance and a finish that hides scratches and scuffs.
Choosing Colors and Patterns
Match tile size and grout color to the room’s scale and traffic patterns. Large-format tiles (12×24″ or larger) make small kitchens feel bigger but need a very flat subfloor. Small tiles or mosaics add traction and work well on uneven surfaces or for insets.
Use grout color intentionally: a close match creates a continuous floor; a contrasting grout emphasizes pattern and grid. For busy cabinets or countertops, pick a calmer, neutral tile. If you want visual interest, introduce pattern only in a defined area like a runner or near the sink.
Consider light reflection and maintenance together. Matte or textured surfaces hide dirt and wear better than high-gloss finishes, but glossy tiles make light-limited kitchens feel brighter.
Step-by-Step Preparation and Installation
You will prepare a stable, flat subfloor, plan an efficient tile layout, set tiles with the correct mortar and spacers, then grout and seal for a durable finish. Each stage requires specific tools, measurements, and drying times to prevent failures.
Preparing the Subfloor
Check the substrate for level, cleanliness, and soundness. Use a straightedge or laser level to find dips greater than 1/8 inch over 8 feet; repair those with a patching compound or self-leveling underlayment per manufacturer instructions.
Remove existing flooring that will interfere with adhesion—vinyl, loose tile, or old thinset—and clean the surface of dust, grease, and debris. For plywood or OSB, screw down any squeaks and add a cement backer board or uncoupling membrane if required by tile type.
Measure moisture and ensure the subfloor is within acceptable moisture limits for your thinset and tile. Install a waterproofing membrane in moisture-prone kitchens, especially around sinks and dishwashers, following curing times before proceeding.
Laying Out the Tile Design
Find the room’s centerlines: snap chalk lines across the longest and perpendicular shortest walls to establish a reference grid. Dry-lay a row of tiles along these lines to check edge cuts and adjust the grid so you avoid narrow slivers at perimeter walls.
Decide tile orientation (straight, diagonal, or brick stagger) and calculate tile and grout joint sizes. Use a calculator or sketch to determine how many full tiles, edge cuts, and spacers you need; buy 10–15% extra for cuts and breakage.
Mark control joints or transition areas where movement or height changes occur. Place spacers and layout lines, then take a photo of the dry layout so you can reinstall tiles in the same pattern after applying thinset.
See also: How to Choose the Best Fence for Your Home
Installing and Setting Tiles
Mix thinset mortar to a peanut‑butter consistency, following pot life and temperature guidelines on the bag. Use a notch trowel sized to the tile dimensions (e.g., 1/2″ x 1/2″ for 12×12 tiles), apply with straight ridges, then back‑butter large format tiles for full coverage.
Comb the thinset in one direction, press each tile firmly and twist slightly to collapse ridges and achieve 90–95% coverage on floor installations. Check level frequently with a spirit level and adjust with tapping or adding thinset; maintain consistent grout joint widths using spacers.
Keep a wet sponge and bucket handy to remove excess thinset from joints before it skins over. Allow the thinset to cure for the time the manufacturer specifies—usually 24 hours—before walking on the tiles, longer for heavy traffic or large-format installations.
Grouting and Sealing Techniques
Choose grout type: sanded for joints 1/8″ or wider, unsanded for narrower joints or polished stone. Mix grout to a creamy consistency and apply with a rubber float at a 45° angle, pressing grout into joints until fully packed.
Remove excess grout by holding the float at a shallow angle across tiles, then perform an initial clean with a damp sponge—rinse the sponge frequently. Allow grout to cure per instructions, usually 24–72 hours, then buff haze with a dry microfiber cloth.
Seal grout and porous tiles if required: apply a penetrating sealer to grout lines and natural stone following product dwell times. Reapply sealer every 1–5 years depending on wear and the product’s recommendations; test in a small area first to confirm compatibility.